

TommyFletcher
Everything posted by TommyFletcher
-
TommyFletcher's Customs Collection Showcase
TommyFletcher replied to TommyFletcher's topic in Workshop
Uploaded a new song. Limozeen's "Because, it's Midnite!" YouTube recommends the strangest videos sometimes, and the last two weeks it's been feeding me Guitar Hero: Rocks the 80's videos (I haven't played that game in over a decade). BiM popped up, and seeing as there was no version with that blistering synth solo, I uploaded my own version! Don't worry if you ever get this song during a setlist playthrough, the synth solo is on the bonus lead arrangement. Enjoy! -
Hello and welcome to my workshop thread! Comments and criticisms are welcome, I'm always trying to improve my ear when it comes to transcribing music! I won't do requests at the moment as I don't have a lot of time to do even my own customs, but if time opens up in the future, I may take some requests. I'm always down to hear new music, though, and if I like it, I may do a chart anyway! My customs Latest Release Limozeen (aka Strong Bad) - Because, it's Midnite (Playthrough Video) Works in Progress None at the moment Previous Releases (Alphabetically by Artist): The Dillinger Escape Plan - Farewell, Mona Lisa (Playthrough Video) Echo & the Bunnymen - The Killing Moon* (Playthrough Video) Juanes - Me Enamora* (Playthrough Video) Mors Principium Est - Bringer of Light (Playthrough Video) Nayutan Seijin (NayutalieN) - Alien Alien (Playthrough Video) *Denotes the custom was derived from Rock Band 3 Pro Guitar
-
ShowlightsGen - A tool for creating fast, synced lightshows
TommyFletcher replied to TommyFletcher's topic in Mods & Projects
I'm not sure what the ">___>" is supposed to imply, but it was my understanding that the generator can be quite tedious if you want to fully manually create a lightshow. Although this tool requires a little bit of setup and MIDI knowledge, it makes manual lightshow creation a lot easier. If the button you mentioned can create a lightshow based off of MIDI data like this tool, that could be useful for enthusiasts like myself that like to be in control of everything in a custom. -
The game can recognize both natural harmonics and tapped natural harmonics? The harmonic in my image above would produce an F (octave up from the fretted note) whereas a natural harmonic played at the 15th fret on the D string would produce a C that's about 30 cents flat. I figured the game would just look for the flattened C when a harmonic pops up at fret 15.
-
What if you were to make the harmonic note you tap the note that's playable (with tap, harmonic, and ignore statuses turned on) and at the same time have the fret hand position placed where the player should be fretting the other note. That way the player knows they should not move their left hand as well as tap and try to make a harmonic sound with their right. The ignore status is included so that players can't miss this note as I'm sure the RS engine isn't designed for tap harmonics. Like so:

-
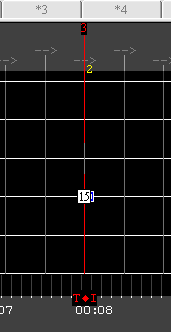
Table of Contents This is a guide for ShowlightsGen, a program to create Rocksmith light shows using MIDI. The guide is set up as follows: Introduction The Setup The Lightshow The Program If you are familiar with MIDI, you can skip most of Step 2, as it mainly shows you how to sync up the MIDI file generated from EoF to the audio. It might still be useful to read, though. 1. Introduction I’ve always liked lightshows, and I wanted to learn how to create my own for Rocksmith. However, there weren’t any programs available yet to generate my own easily. I could edit the showlights XML file manually, but it was really tedious. I wanted to use MIDI somehow, as I’m quite familiar with it, so I created this tool to read a MIDI track and generate a showlights XML that the RS Toolkit can use to create a package. The final result so far has been to create a file that syncs to the music See here for an example: https://i.imgur.com/uHcLato.mp4 2. The Setup As this tool requires MIDI file, you need a way to edit and export them. I personally use the DAW "REAPER" by Cockos. It’s free (it has a 60-day non-restrictive trial) and more than powerful enough for what we need to use it for. Any images included here will be using it. However, any MIDI editor should work for this tutorial. I will assume you have a song ready to play in RS and that no more edits to the tempo map will be taking place. First, we need a MIDI to add lightshow events to. Lucky for us, EoF generates a “notes.mid” file when saving a custom. However, its time values do not match what is in EoF: As you can see in the red circled area, the start of the MIDI portion in EoF is at 0:06.356, but when importing the MIDI it starts at 0 seconds There are two ways to handle this: The first method involves ignoring this and using the Showlights tool to designate the starting note. This is quicker, but results in some rounding errors possibly causing your events to be off a few milliseconds. Not that it is noticeable in-game, but your conscience will know. The second method involves making a change to the tempo map of your MIDI editing software before you import it. This takes a few more minutes, but this will sync the tempo map in your MIDI software to EoF for ease of use. NOTE: Due to how MIDI conversions work, the sync is not 100% for either method. However, the max difference I have seen for method 1 is up to 2-3ms whereas with method 2 it’s only 1ms that I have seen with my testing. Setting up using method 1 On an empty project, import your notes.mid into your editor at measure 1.1.00. If using REAPER, make sure you import all tracks as separate and import your tempo map: Setting up using method 2 On an empty project, go to the position in your editor that matches the first measure in EoF (where the white lines start appearing). In my example it is 0:06.356. After going to this timecode, in Reaper I can select everything from the beginning of the project to the position at 6.356, click on Insert -> Measure from time selection (new time signature). On the popup screen change the time signature to the first time signature of your EoF project, and the “Bars” to whatever makes the BPM similar to the first tempo marker in EoF. In this case, 4 measures gives me a tempo of 151, and that’s pretty close to my first tempo marker of 152 Now, import your notes.mid to start at the end of the new measures you just created. For me that’s at the start of the 5th measure. If using REAPER, you can click and drag it into the program and a grey box will show you where the program will insert the MIDI file after releasing the mouse. After releasing, you will get a popup asking if you want to expand the tracks it found into separate tracks and if you want to import the tempo map starting the 5th measure. You’ll want both boxes checked. Otherwise you’ll either get only one track, which will be messy. Or your tempo map will not be imported and cause your notes to be out of sync if your song has multiple tempo changes. Your MIDI tracks will now be in your REAPER project and automatically selected: The light gray you see means the tracks are highlighted. Before deselecting them, hover your mouse over the left edge of one them, your mouse cursor will change to an arrow pointing left. Click on the left edge of a track and drag it to the beginning of your project. By default, REAPER has a feature called “Loop Source.” This is used to create loops of patterns, but we don’t want that for this purpose. With the MIDI tracks still selected, press F2 and uncheck the “Loop Source” button and press OK. Deselect all tracks by clicking on an empty space. Double click on the gray track that has the label “EVENTS.” This opens the MIDI editor of REAPER. Scroll to the beginning and look for the “Track Name” event called “EVENTS.” Double click it, and change the Position value to 1.1.00: This moves the track name to the beginning which the tool needs to use to convert from MIDI to XML. Close the MIDI editor portion to continue with the main guide. This ends the separate methods. The guide from now on will be relevant to both methods. Setup (continued) After importing your MIDI (and setting it up for method 2 if needed), select all the tracks except for EVENTS and delete them. You only need the EVENTS track. Import your music and sync it to your tempo map. With the remaining EVENTS track, open it up in the MIDI editor (using REAPER, you double click on it). 3. The Lightshow After opening up the MIDI editor portion of your program, insert your notes here. The lighting events correspond to the note values as found in section 12 of iminashi’s “Guidelines for Official-Looking Customs (Found Here) The program only looks for the start times of notes for changing the lights. The lightshow.xml file does not determine when events end. An example of a full lightshow file looks like this in the editor: If using REAPER, please feel free to download this text file: Here You can import into REAPER to make the note names on the left side correspond to the colours the midi notes represent. 4. The Program After setting up and creating your light events, it’s time to export your EVENTS track to a MIDI file. In REAPER, this is done by making sure your EVENTS track is selected. Then, click on File -> Export Project MIDI. Make sure your export settings look like these: Because we’re only exporting one track, the multitrack option isn’t crucial (I haven’t tested it if "merge to single" is active, better to export as multi, just in case, as I know that will work) and make sure the “Embed project tempo/time signature changes” box is checked. Save it to where you’d like and go to the folder where the program is. The MIDI file does not need to be in the same folder as the program. Upon opening the program, you’ll be asked to select your MIDI file. Then you’ll be asked where to save the XML file. Then, a box pops up asking for the time you’d like to sync the first note to. What you do here depends on the method used above: If you used method one, where you did not sync your MIDI project to your EoF project, you type in (up to three decimal digits) the starting note you want your first lighting event to sync to. For example, in my EoF image above, my first note started at 9.514 and using method 1, my intention was for my first light event to match that note. I would type in 9.514 and press enter, it will shift all notes. If you used method two, you can leave it blank and press enter. Please note: This program assumes you are using standard charting conventions where you give the player some time before your first note shows up. Therefore, any value entered that’s below 8 will assume that you are using method 2 and make the first note match the MIDI file. If you are using method 1, please make sure your EoF file starts on 8 or after. After it completes (should only take a second), a new XML file will appear where you saved it. This file can be imported into the toolkit directly. Please see this video for an example of a lightshow created using this tool. https://www.youtube.com/watch?v=m0JG3BcQakA See here for the MIDI file used to create the lightshow and converted by the tool: MIDI file Download Links: 64-bit Executable: Here Python File: Here Please excuse the filesize for the compiled exe. I’m only really familiar with Python and the easiest way to compile a Python script into an executable was to compile it with all dependencies included. If you wish to save space, or use an operating system that doesn't support 64-bit exe files, feel free to download the script and run it in Python instead. The dependencies that are necessary to be on your system are: Mido Easygui Sys Math Having said that, I hope you enjoy creating some sweet lightshows!